Sunday 29 November 2009

WOULD YOU LIKE MIKE CLARKS UNDERWATER IMAGES IN TIME FOR CHRISTMAS


Hi All,
I hope you are enjoying my blog, there are certainly many more interesting articles and images in the pipeline. This is just a wee blog to let you know that after a bit of difficulty with my Photobox photo gallery, I have now been able to update them. I have also added a topside gallery full of Castles and Birds, with lots more wildlife to be added in due course.


The Galleries on Photobox show only a fraction of my work, so if you are after a print of something from above or below the waves but cant see it on that site, just give me a mail with your requirements and i will look out relevant material. So if you fancy something for your nearest and dearest please do take a look at the images in the my prints section of the website and i will get it delivered before Santa arrives.
all the best and have a great Christmas and New Year.
Mike Clark


MIKE CLARK DIVES K17 AT LAST


A weather window appeared and Marine Quest took advantage of it. I was surprised when Jim told me the trip to K17 was on. I had dived the K4 B4 but K17 was new to me and i was really looking forward to the trip. Here are a brief selection of my images from the trip. It was very hard work getting these images as the tide was fierce. I would think that there are very few pictures if any at all of this shipwreck. A more expansive article will feature in due course. Thanks Marinequest.

Thursday 26 November 2009

RED HAT MAXIMUS WING REVIEW

Red hat 90lb Maximus wing review
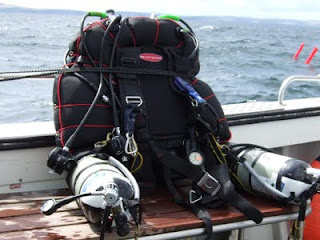
There must be dozens of wings out there for use when technical diving. On Dive boats I’ve noted the usual brands and a few lesser known setups, which for me are always interesting to have a look at. Over the years I have used a few types and brands such as the original Northern Diver Sea Eagle with a Stainless Steel (SS) Back Plate, now I use a mares BC for shallow stuff and the new Buddy Tek wing for my independent twins. For my technical diving I was going to use manifolded twin 12l cylinders and needed a SS or Aluminium (ALI) back plate to bolt them onto with ss bands. (Buddy don’t recommend using manifolded twins with the buddy band system).
I was trawling web sites looking for a wing when I came across Red Hat Diving, I liked the look of their wings, so I contacted John Hewitt, the proprietor and he kindly sent me up a 90LB Maximus dive wing with ss back plate and a premium harness to review along with other optional pockets, harnesses, and a couple of weight harnesses. Over the course of the last 4 or 5 months I have been trying out this kit on my deeper technical dives.
The first thing that strikes you with this wing is that it is almost identical to the OMS wing. I had ample chance to compare the Red Hat Maximus with the OMS wing as my buddy Gordon Mackie of GM Diving uses one. There are two important differences between the wings though, firstly, the cost of the Maximus which is a fraction of the OMS set up. Secondly the materials used are lighter than the OMS. So where in these tight economic times I liked the price very much I wanted to ensure that the wing was up to the rigors of deep multi tank technical diving, here is how I got on.
WING
The Maximus wing is a truly modular system and you can customise it for your needs. The bladder of the wing can be supplied in 3 sizes- 90lb, 50lb and 30 lb. The outer of which comprises 1680 denier nylon. Inside of this is the inner bag which is constructed of 210 denier nylon with thermoplastic polyurethane (TPU) bonded layer.
This makes a sturdy puncture and abrasion resistant package. I had initial fears re the inner bag as it felt so light and flexible compared to the old style clear plastic inner bags found on some bc’s. I found out that it may be light but it’s very strong and the new TPU inner lining performed very well with no leaks or tears. The inner is slightly larger than the outer cover so it will never over inflate, which reduces stress on the inner bag. On further investigation I found out that the TPU inner is the preferred choice for many technical divers. A semi-circular zipper around the inside of the wing allows for easy inspection of the interior bladder.
The wing also comprises a trap door drainage system which allows water to drain rapidly from the outer cover to minimize excess weight and improve diver comfort. It must work as I found no problems with trapped pockets of water. The bladder also contains 2 dump valves, one controlled by a pull toggle at the top of the bag and another to the rear of the wing. There is a corrugated inflation hose with a stainless steel inflation button. I really liked this as it added a wee bit of weight and kept the hose from moving around.
One thing I did change on the wing was initially the corrugated hose came over the shoulder of the wing. I swapped this with the location of the pull dump so that the corrugated hose hung straight down the front of the wing as with the OMS wing. All these valves have the same fitting so you can set the wing up exactly how you like it. The inflation unit supplied does not have a steel cable running through it allowing it to be used as a pull dump as in most sport Bc’s. This I expected from a technical wing as most wings do not employ a pull dump in the corrugated hose.
Lastly the wing is surrounded by elastomeric bands (use is optional) these assist in deflation, but still allow the diver to orally inflate the BC. I liked the bands and found they did not hinder inflation. If anything I would have liked slightly thicker bands adding a little bit more tension, or I could just slightly tighten the existing bands. I personally like to have the wing as streamlined as possible, that said I am aware of the debate surrounding the advantage of using bands or not. With this set up the choice is completely yours.


BACKPLATES
There is a choice of 3 back plates –Aluminium that can be supplied in a range of colours for the fashion conscious and two types of Stainless Steel back plates. The first one is an Economy back plate from Taiwan, I decided to go for the 316 marine grade SS back plate made in the UK. All come with mounting holes allowing for height adjustment. There are also mounting holes around the periphery of the back plate. There is therefore no lack of mounting options. This gave me the advantage of having 6lb of non removable weight comfortably spread across my back. After my 5 months of use there was no sign of corrosion and the backpack looked like new.

HARNESS
This is probably the most important part of any wing system. The Maximus offers 2 choices of harness. The Sports Harness is the more basic of the two harnesses on offer but I would say it’s very high spec. Two adjustable shoulder clips, 4 D rings, Padded Shoulder pads, crotch strap, Chest strap, back plate pad and a stainless steel buckle. It’s fully adjustable and very versatile. If you want flexibility this is a good choice. I opted for the Premium harness which boasts all of the above. The waist bands and shoulder pads are stitched onto the harness and the fitting are plusher. The back pad with it’s red hat logo is extremely comfy. There are a further 6 small D rings attached to the back of the harness for clipping on further items. For the extra few pounds I think the premium harness is extremely good value for money. I have seen a few inspiration users and OMS wing users using this harness. This didn’t surprise me much as the premium is very similar harness to the OMS IQ pack. I found it extremely comfy and easy to use.
ACCESSORIES
The maximus wing comes with a large selection of pockets and accessories.
I found the large utility/ mask pouch which is mounted on the waist band at the stomach very useful for popping all my tables, mask, and line cutters in. The only thing I would have liked to see in it was a little D ring to secure these items too.
Weight pouches are also available to fit directly to the harness but I found these to be of limited use, especially with side mounts. Trim weight pouches are useful and there are pockets for sheers, a no sag pocket which looks good. There is also a vertical mounted weight pocket and a thigh pocket. There is plenty of variety, so you will be able to customise your kit exactly the way you want it.
Conclusion
It’s not as tough as the OMS but then very few things on earth are as the OMS is bombproof. The Maximus is certainly no cheap copy but it is made of lighter materials than the OMS. Is the Maximus tough enough for technical UK diving? Well going from my experience yes, it’s handled all the wreck diving I could throw at it and still looks as good as new. I found it an extremely comfortable and easy to use wing. If you are into designer labels you will prefer to look at the fashionable brands. But if you don’t mind not having a certain logo on your kit I would strongly recommend the Maximus wing system by Red Hat Diving. I liked it so much I decided to put my money where my mouth was and bought the product. I will of course keep you informed how I continue to get on with this wing.
Cost for the 90lb wing, premium harness and the economy ss back plate as a package is £278.50. That’s a 10% saving on buying the items individually.
If you would like to see more about the Maximus Wing and other dive equipment visit
RED HAT DIVING
WEB-
www.johnhewitt.com/maximus.htm
e-mail john@divertrainingservices.co.uk
Telephone 01757 702487 or 0845 2 RED HAT (733428)
Postal address,
Red Hat, (or Diver Training Services) as appropriate
Beechcroft, Holme Lane, Selby, Yorkshire, YO8 3EL

Mike Clark

Sunday 15 November 2009

Scottish Sub Aqua Club


"Mike Clark - Underwater photographer on
- Eyemouth the new Scapa.
Pristine wartime wrecks, undisturbed untill now. With new wrecks being found each month Eyemouth is set to become the new Scapa in Scottish Diving. Add to that the fantastic scenic diving that the area boasts Eyemouth is now seriously on the diving map no longer the silent partner to St. Abbs."
I thought the talk went very well and i certainly enjoyed the day!

Thursday 5 November 2009

SUUNTO HelO2 review


Suunto HelO2 Trimix Dive Computer review

Last year I dipped my toe into trimix diving. I soon found out that it’s a lot more complicated than air and nitrox diving.
It wasn’t long before I was getting frustrated by using tables again; it seemed like a huge step backwards. It’s not the easiest task in the world sticking to a run time. I soon wished I could get a computer to use for this type of diving but the VR3 and other trimix computers appeared to be well out of my budget.
Then I saw the press release re the Suunto Helo2 the first dedicated Trimix diving computer from a mainstream manufacturer. I was very interested in it and I managed to get my hands on one. Over the last few months ive been putting it through its paces for Scottish Diver.
Initially a pre production unit was sent to me, instruction manuals were not available and the dive planning software was a beta version not the finished product.
This in itself was not a problem I had used a Suunto D9 computer in the past and found the menu’s very easy to navigate as will any diver who has used a Suunto computer before. In fact I would say it was extremely user friendly and I was soon imputing trimix mixes into the unit. This is the first plus point for this computer it’s extremely easy to use.
The HelO2 can dive to 120 metres and program and utilize up to 8 gas mixes. These can be set as “Primary” where the computer will include the gas in the dive plan and calculate time to surface etc. The “Secondary” setting is for gas that you do not carry but may use such as drop tanks or a buddies cylinder. These gas mixes’s will be stored in the computer but not used in the calculation until manually selected. Thirdly there is the “off” setting which is self explanatory. Mix’s that are turned off cannot be turned on underwater.
My first dives with the unit were purely observational whilst I dived using V planner tables (Conservatism = + 2). It’s extremely hard to compare a computer to tables. The Suunto HelO2 has 5 conservatism settings. -2 to +2 with -2 being aggressive and +2 adding in safety. I used the setting with 0 conservatism right in the middle, which is the default factory setting for the average diver.
The Suunto HelO2 uses a Suunto technical RGBM (reduced gradient bubble model) decompression model designed by Suunto and Dr. Bruce Wienke. Now unlike these guy’s I am no decompression theory expert so im not delving into explaining that but what I will explain is how the Suunto HelO2 dives.
On my initial dive following the V Planner tables run times looked similar for a 64 metre dive with a bottom time of 15 minutes. Everything worked well on the dive and the display on the HelO2 was clear and easy to read apart from the small dive time display on the bottom right of the screen which I found is partly obscured by the screen protector I could read the figures but not see the label. I repositioned the unit on my arm and this problem was solved. After 15 minutes I ascend sticking to my runtime. The HelO2 utilizes deep stops which are recommended but not compulsory. If you do not carry them out however you will receive a deco penalty at shallower depths. Sticking to my table runtime I missed the deep stops and when I had finished my deco requirements with the V Planner table the HelO2 was displaying a further 10 minutes of deco. From subsequent dives I can confirm that this was due to missing the deep stops.
The deep stop system was new to me and I really liked it. The computer gives a ceiling that can be ascended to; it’s highlighted “deep stop” to avoid any confusion with mandatory deco stops. Once the desired depth is reached a time display starts to count down in seconds. It’s neat and clear and once the time is up the next ceiling is displayed and depending on depth this is repeated until the mandatory deco stops are shown. Minimum ascent time is displayed and an hour glass formed by 2 arrows shows that you are in the optimum deco zone.
Once in the deco zone and using higher % O2 mix’s, the dive time display can be toggled through to view Oxygen information and the current PPO2 and your accumulated OLF% can be interrogated all by the push of a single button. Once again nice and easy.
Changing the gases on a dive is also straightforward. If the gas mixes are “Primary” The HelO2 will prompt you to switch gas once the safe PPO2 levels are obtained when a richer gas for decompression can be utilized. The display at the bottom left of the HelO2 screen can be toggled between max depth and the gas mix that you are currently using. Using mixed gases I kept my unit in the gas display showing O2% and He% for instance my bottom gas was 18/30. This display will start to flash and 3 beeps will occur (I didn’t hear them but I wear a really thick hood) when a better primary deco gas is available. A push and hold on 1 button and then a push on the select button to switch and select the gas. The HelO2 shows a confirmation message. Very simple and straightforward this is the beauty of this computer. I found it simplifies complex diving operations enriching the diving experience. The hand unit is only half of the package though!
The Suunto Dive Manager Version 3 is the software that can be used as a logbook of your dive. The USB interface from PC to HelO2 is included along with the software in the package which is a nice touch as other computer manufacturers charge extra for these items.
The Suunto Dive Manager Version 3 also interfaces with The Suunto Dive Planer which lets u plan dives setting Depth, Time, Gas mix’s to be used conservatism settings etc. From this you can print off a chart showing your runtime which is a great safety factor. This can be printed out to take as a back up on your dive. Another function is after your dive with partially empty cylinders this software calculates how much Helium and oxygen you require to blend your desired mix for the next dive. This is a great help if you are a trained blender on a live aboard trip or if you want to advise the fill station exactly what you would like in your cylinders.
Gas mix’s can be input directly into the HelO2 if you do not have a pc. If you do use the dive planner software though, you will be able to export your gas mixes and conservatism setting from the pc to the HelO2 whilst looking at your selected dive plan on the pc screen. I found this very pleasant to use, all the information you need is on a colour graph on your pc screen. All the deco and O2 requirements are visually brought to you with different colours showing different gas mixes and red’s showing where safe CNS O2 limits have been breeched or your equivalent narcotic depth of a gas has been breeched.
Once again its all very user friendly and easy to use and it certainly helped me plan deep technical dives. I found the package made it a much more interesting, enjoyable and easy task than purely looking at run times on tables.
So for technical diving in the 50-70 metre range as far as I could compare, for the reasons given above the HelO2 gave similar run times to V Planner tables. Also dive times were similar to VR3 computers which were used by buddies. If anything the HelO2 may give slightly longer deco penalties at the shallow stops. I like to keep things safe so this was perfectly acceptable for me. If you are young and fit and diving regularly you can always move the conservatism settings to the more aggressive -1 or -2 setting.
So for somebody like me getting into open circuit trimix diving this computer will make the whole process much more simple and enjoyable. It certainly gave me more time to focus on the diving and the freedom of using a computer rather than sticking rigidly to tables. In short I liked this product very much.
For people who use CCR rebreathers though the HelO2 is only for open circuit trimix. The Max Depth of 120 Metres may be restrictive for some technical divers.
I also used the HelO2 on some standard air/nitrox dives. As previously reviewed I compared the HelO2 to the Apex Quantum. My findings where that on the first dive of the day, although both computers went about their deco in different ways. When completing the deep stops for the HelO2 the deco requirements were almost identical, certainly within a minute.
On the second dive of the day I observed that the Apex Quantum required extra decompression penalties of up to 3 minutes. This may have been a penalty for lingering at depth completing my deep stops for the HelO2.
Conclusion
The Beauty of the HelO2 is its ease of use both the dive computer itself and the dive manager and planning software. The cost of the unit is currently £645 and as a package with a transmitter £955. This in its own makes it very attractive to divers being cheaper to buy than the VR3 and the Shearwater Pursuit. Also the software, pc interface come with the computer. So for divers undertaking open circuit trimix diving I expect the HelO2 to become a very popular unit. The Suunto name and the HelO2 could bring technical trimix diving to the masses.
The HelO2 is designed specifically for open circuit, so CCR divers will find limited use for this product. Also the 120M depth limit may restrict more adventurous divers. To most divers though this is an extremely useful and exciting product my only negative comment would be I found it hard to read the small displays at the bottom of the screen. Not the numbers themselves but the label identifying the max depth or dive time. The text is quite small and is partly obscured by the screen protector. PPO2 and OLF% and temperature are not obscured by the protector. Moving the unit on my wrist certainly helped and I was able to happily read the labels once again I stress that it was only the label dive time and max depth that I had difficulty seeing and not the units themselves. It’s a minor point. Otherwise the display is very clear and displays so much information to keep you completely in control of your trimix diving. Overall an extremely nice product to use.

Mike Clark