
Red hat 90lb Maximus wing review
There must be dozens of wings out there for use when technical diving. On Dive boats I’ve noted the usual brands and a few lesser known setups, which for me are always interesting to have a look at. Over the years I have u sed a few types and brands such as the original Northern Diver Sea Eagle with a Stainless Steel (SS) Back Plate, now I use a mares BC for shallow stuff and the new Buddy Tek wing for my independent twins. For my technical diving I was going to use manifolded twin 12l cylinders and needed a SS or Aluminium (ALI) back plate to bolt them onto with ss bands. (Buddy don’t recommend using manifolded twins with the buddy band system).
I was trawling web sites looking for a wing when I came across Red Hat Diving, I liked the look of their wings, so I contacted John Hewitt, the proprietor and he kindly sent me up a 90LB Maximus dive wing with ss back plate and a premium harness to review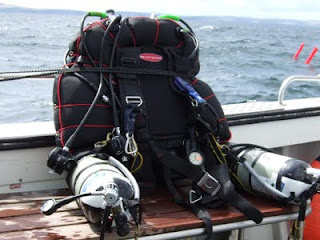 along with other optional pockets, harnesses, and a couple of weight harnesses. Over the course of the last 4 or 5 months I have been trying out this kit on my deeper technical dives.
The first thing that strikes you with this wing is that it is almost identical to the OMS wing. I had ample chance to compare the Red Hat Maximus with the OMS wing as my buddy Gordon Mackie of GM Diving uses one. There are two important differences between the wings though, firstly, the cost of the Maximus which is a fraction of the OMS set up. Secondly the materials used are lighter than the OMS. So where in these tight economic times I liked the price very much I wanted to ensure that the wing was up to the rigors of deep multi tank technical diving, here is how I got on.
WING
The Maximus wing is a truly modular system and you can customise it for your needs. The bladder of the wing can be supplied in 3 sizes- 90lb, 50lb and 30 lb. The outer of which comprises 1680 denier nylon. Inside of this is the inner bag which is constructed of 210 denier nylon with thermoplastic polyurethane (TPU) bonded layer.
This makes a sturdy puncture and abrasion resistant package. I had initial fears re the inner bag as it felt so light and flexible compared to the old style clear plastic inner bags found on some bc’s. I found out that it may be light but it’s very strong and the new TPU inner lining performed very well with no leaks or tears. The inner is slightly larger than the outer cover so it will never over inflate, which reduces stress on the inner bag. On further investigation I found out that the TPU inner is the preferred choice for many technical divers. A semi-circular zipper around the inside of the wing allows for easy inspection of the interior bladder.
The wing also comprises a trap door drainage system which allows water to drain rapidly from the outer cover to minimize excess weight and improve diver comfort. It must work as I found no problems with trapped pockets of water. The bladder also contains 2 dump valves, one controlled by a pull toggle at the top of the bag and another to the rear of the wing. There is a corrugated inflation hose with a stainless steel inflation button. I really liked this as it added a wee bit of weight and kept the hose from moving around.
One thing I did change on the wing was initially the corrugated hose came over the shoulder of the wing. I swapped this with the location of the pull dump so that the corrugated hose hung straight down the front of the wing as with the OMS wing. All these valves have the same fitting so you can set the wing up exactly how you like it. The inflation unit supplied does not have a steel cable running through it allowing it to be used as a pull dump as in most sport Bc’s. This I expected from a technical wing as most wings do not employ a pull dump in the corrugated hose.
Lastly the wing is surrounded by elastomeric bands (use is optional) these assist in deflation, but still allow the diver to orally inflate the BC. I liked the bands and found they did not hinder inflation. If anything I would have liked slightly thicker bands adding a little bit more tension, or I could just slightly tighten the existing bands. I personally like to have the wing as streamlined as possible, that said I am aware of the debate surrounding the advantage of using bands or not. With this set up the choice is completely yours.
BACKPLATES
There is a choice of 3 back plates –Aluminium that can be supplied in a range of colours for the fashion conscious and two types of Stainless Steel back plates. The first one is an Economy back plate from Taiwan, I decided to go for the 316 marine grade SS back plate made in the UK. All come with mounting holes allowing for height adjustment. There are also mounting holes around the periphery of the back plate. There is therefore no lack of mounting options. This gave me the advantage of having 6lb of non removable weight comfortably spread across my back. After my 5 months of use there was no sign of corrosion and the backpack looked like new.
HARNESS
This is probably the most important part of any wing system. The Maximus offers 2 choices of harness. The Sports Harness is the more basic of the two harnesses on offer but I would say it’s very high spec. Two adjustable shoulder clips, 4 D rings, Padded Shoulder pads, crotch strap, Chest strap, back plate pad and a stainless steel buckle. It’s fully adjustable and very versatile. If you want flexibility this is a good choice. I opted for the Premium harness which boasts all of the above. The waist bands and shoulder pads are stitched onto the harness and the fitting are plusher. The back pad with it’s red hat logo is extremely comfy. There are a further 6 small D rings attached to the back of the harness for clipping on further items. For the extra few pounds I think the premium harness is extremely good value for money. I have seen a few inspiration users and OMS wing users using this harness. This didn’t surprise me much as the premium is very similar harness to the OMS IQ pack. I found it extremely comfy and easy to use.
ACCESSORIES
The maximus wing comes with a large selection of pockets and accessories.
I found the large utility/ mask pouch which is mounted on the waist band at the stomach very useful for popping all my tables, mask, and line cutters in. The only thing I would have liked to see in it was a little D ring to secure these items too.
Weight pouches are also available to fit directly to the harness but I found these to be of limited use, especially with side mounts. Trim weight pouches are useful and there are pockets for sheers, a no sag pocket which looks good. There is also a vertical mounted weight pocket and a thigh pocket. There is plenty of variety, so you will be able to customise your kit exactly the way you want it.
Conclusion
It’s not as tough as the OMS but then very few things on earth are as the OMS is bombproof. The Maximus is certainly no cheap copy but it is made of lighter materials than the OMS. Is the Maximus tough enough for technical UK diving? Well going from my experience yes, it’s handled all the wreck diving I could throw at it and still looks as good as new. I found it an extremely comfortable and easy to use wing. If you are into designer labels you will prefer to look at the fashionable brands. But if you don’t mind not having a certain logo on your kit I would strongly recommend the Maximus wing system by Red Hat Diving. I liked it so much I decided to put my money where my mouth was and bought the product. I will of course keep you informed how I continue to get on with this wing.
Cost for the 90lb wing, premium harness and the economy ss back plate as a package is £278.50. That’s a 10% saving on buying the items individually.
If you would like to see more about the Maximus Wing and other dive equipment visit
RED HAT DIVING
WEB- www.johnhewitt.com/maximus.htm
e-mail john@divertrainingservices.co.uk
Telephone 01757 702487 or 0845 2 RED HAT (733428)
Postal address,
Red Hat, (or Diver Training Services) as appropriate
Beechcroft, Holme Lane, Selby, Yorkshire, YO8 3EL
Mike Clark
There must be dozens of wings out there for use when technical diving. On Dive boats I’ve noted the usual brands and a few lesser known setups, which for me are always interesting to have a look at. Over the years I have u
 sed a few types and brands such as the original Northern Diver Sea Eagle with a Stainless Steel (SS) Back Plate, now I use a mares BC for shallow stuff and the new Buddy Tek wing for my independent twins. For my technical diving I was going to use manifolded twin 12l cylinders and needed a SS or Aluminium (ALI) back plate to bolt them onto with ss bands. (Buddy don’t recommend using manifolded twins with the buddy band system).
I was trawling web sites looking for a wing when I came across Red Hat Diving, I liked the look of their wings, so I contacted John Hewitt, the proprietor and he kindly sent me up a 90LB Maximus dive wing with ss back plate and a premium harness to review
 along with other optional pockets, harnesses, and a couple of weight harnesses. Over the course of the last 4 or 5 months I have been trying out this kit on my deeper technical dives.
The first thing that strikes you with this wing is that it is almost identical to the OMS wing. I had ample chance to compare the Red Hat Maximus with the OMS wing as my buddy Gordon Mackie of GM Diving uses one. There are two important differences between the wings though, firstly, the cost of the Maximus which is a fraction of the OMS set up. Secondly the materials used are lighter than the OMS. So where in these tight economic times I liked the price very much I wanted to ensure that the wing was up to the rigors of deep multi tank technical diving, here is how I got on.
WING
The Maximus wing is a truly modular system and you can customise it for your needs. The bladder of the wing can be supplied in 3 sizes- 90lb, 50lb and 30 lb. The outer of which comprises 1680 denier nylon. Inside of this is the inner bag which is constructed of 210 denier nylon with thermoplastic polyurethane (TPU) bonded layer.
This makes a sturdy puncture and abrasion resistant package. I had initial fears re the inner bag as it felt so light and flexible compared to the old style clear plastic inner bags found on some bc’s. I found out that it may be light but it’s very strong and the new TPU inner lining performed very well with no leaks or tears. The inner is slightly larger than the outer cover so it will never over inflate, which reduces stress on the inner bag. On further investigation I found out that the TPU inner is the preferred choice for many technical divers. A semi-circular zipper around the inside of the wing allows for easy inspection
 of the interior bladder.
The wing also comprises a trap door drainage system which allows water to drain rapidly from the outer cover to minimize excess weight and improve diver comfort. It must work as I found no problems with trapped pockets of water. The bladder also contains 2 dump valves, one controlled by a pull toggle at the top of the bag and another to the rear of the wing. There is a corrugated inflation hose with a stainless steel inflation button. I really liked this as it added a wee bit of weight and kept the hose from moving around.
One thing I did change on the wing was initially the corrugated hose came over the shoulder of the wing. I swapped this with the location of the pull dump so that the corrugated hose hung straight down the front of the wing as with the OMS wing. All these valves have the same fitting so you can set the wing up exactly how you like it. The inflation unit supplied does not have a steel cable running through it allowing it to be used as a pull dump as in most sport Bc’s. This I expected from a technical wing as most wings do not employ a pull dump in the corrugated hose.
Lastly the wing is surrounded by elastomeric bands (use is optional) these assist in deflation, but still allow the diver to orally inflate the BC. I liked the bands and found they did not hinder inflation. If anything I would have liked slightly thicker bands adding a little bit more tension, or I could just slightly tighten the existing bands. I personally like to have the wing as streamlined as possible, that said I am aware of the debate surrounding the advantage of using bands or not. With this set up the choice is completely yours.
BACKPLATES
There is a choice of 3 back plates –Aluminium that can be supplied in a range of colours for the fashion conscious and two types of Stainless Steel back plates. The first one is an Economy back plate from Taiwan, I decided to go for the 316 marine grade SS back plate made in the UK. All come with mounting holes allowing for height adjustment. There are also mounting holes around the periphery of the back plate. There is therefore no lack of mounting options. This gave me the advantage of having 6lb of non removable weight comfortably spread across my back. After my 5 months of use there was no sign of corrosion and the backpack looked like new.
HARNESS
This is probably the most important part of any wing system. The Maximus offers 2 choices of harness. The Sports Harness is the more basic of the two harnesses on offer but I would say it’s very high spec. Two adjustable shoulder clips, 4 D rings, Padded Shoulder pads, crotch strap, Chest strap, back plate pad and a stainless steel buckle. It’s fully adjustable and very versatile. If you want flexibility this is a good choice. I opted for the Premium harness which boasts all of the above. The waist bands and shoulder pads are stitched onto the harness and the fitting are plusher. The back pad with it’s red hat logo is extremely comfy. There are a further 6 small D rings attached to the back of the harness for clipping on further items. For the extra few pounds I think the premium harness is extremely good value for money. I have seen a few inspiration users and OMS wing users using this harness. This didn’t surprise me much as the premium is very similar harness to the OMS IQ pack. I found it extremely comfy and easy to use.
ACCESSORIES
The maximus wing comes with a large selection of pockets and accessories.
I found the large utility/ mask pouch which is mounted on the waist band at the stomach very useful for popping all my tables, mask, and line cutters in. The only thing I would have liked to see in it was a little D ring to secure these items too.

Weight pouches are also available to fit directly to the harness but I found these to be of limited use, especially with side mounts. Trim weight pouches are useful and there are pockets for sheers, a no sag pocket which looks good. There is also a vertical mounted weight pocket and a thigh pocket. There is plenty of variety, so you will be able to customise your kit exactly the way you want it.
Conclusion
It’s not as tough as the OMS but then very few things on earth are as the OMS is bombproof. The Maximus is certainly no cheap copy but it is made of lighter materials than the OMS. Is the Maximus tough enough for technical UK diving? Well going from my experience yes, it’s handled all the wreck diving I could throw at it and still looks as good as new. I found it an extremely comfortable and easy to use wing. If you are into designer labels you will prefer to look at the fashionable brands. But if you don’t mind not having a certain logo on your kit I would strongly recommend the Maximus wing system by Red Hat Diving. I liked it so much I decided to put my money where my mouth was and bought the product. I will of course keep you informed how I continue to get on with this wing.
Cost for the 90lb wing, premium harness and the economy ss back plate as a package is £278.50. That’s a 10% saving on buying the items individually.
If you would like to see more about the Maximus Wing and other dive equipment visit
RED HAT DIVING
WEB- www.johnhewitt.com/maximus.htm
e-mail john@divertrainingservices.co.uk
Telephone 01757 702487 or 0845 2 RED HAT (733428)
Postal address,
Red Hat, (or Diver Training Services) as appropriate
Beechcroft, Holme Lane, Selby, Yorkshire, YO8 3EL
Mike Clark


